75 Dually Project - 22s and stylin

75dually
+1y
No prob! My suggestion is to mock everything up and then run the whole system through it's paces and then you can decide the exact placement for the bags/mounts/angles.

75dually
+1y
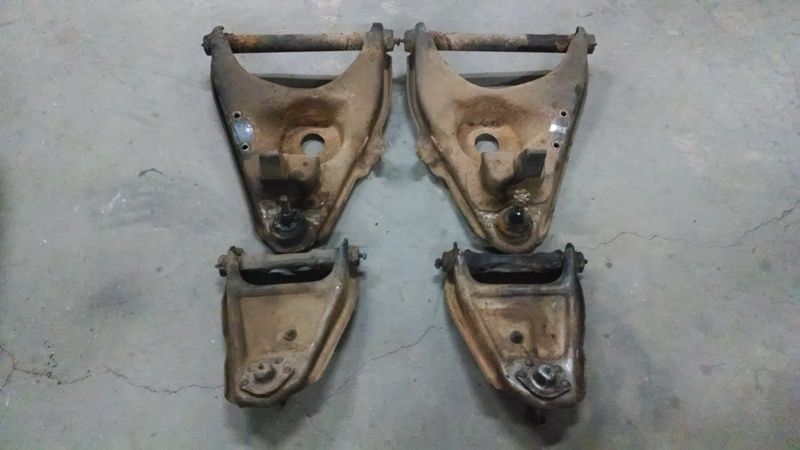
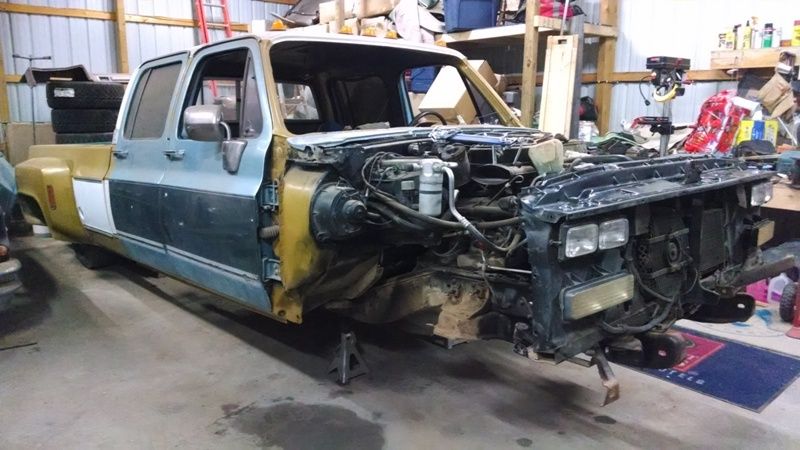
Some progress! After having a head cold all this week I finally felt good enough to get out into the shop. With the truck turned around in the shop I attacked the front end. Today I got the entire front suspension removed and started to clean up all those layers of West Texas dust!!! Actually the front end was fairly clean, and the a-arms were in good shape overall.
Tomorrow I plan on starting to mock up the new front suspension. I want to work with the dimensions of the stretched a-arms, and I think I have an interesting idea on how I can do that. I have my drop spindles, and SRW brakes that I will get assembled to see if I can find the best dimensions. Hopefully I will snap some more shots tomorrow and give you guys some updates.
Tomorrow I plan on starting to mock up the new front suspension. I want to work with the dimensions of the stretched a-arms, and I think I have an interesting idea on how I can do that. I have my drop spindles, and SRW brakes that I will get assembled to see if I can find the best dimensions. Hopefully I will snap some more shots tomorrow and give you guys some updates.


luifer76
+1y
great progress bro....

75dually
+1y
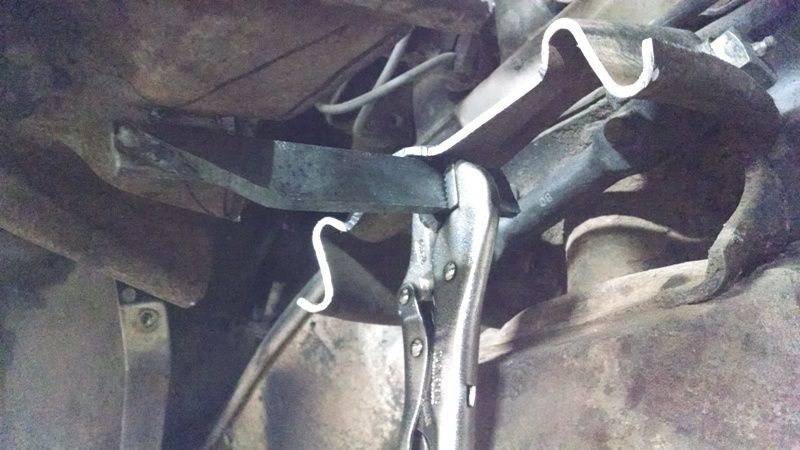
So here is my passenger upper a-arm getting ready to be stretched. I welded two tabs on the bottom of the a-arm along the center line. Then I welded a long piece to the front tab. This way I can clamp it, just like I did in the picture below, to the second tab which will allow me to play with the dimensions once I get the spindle and brakes set up.
I am also going to do the same basic thing to the bottom a-arm so I can mock up the whole assembly and check all the dimensions and the final angles.
I am going to start with 2.5" on the bottom and 3" on the top, but once I lock in the final dimensions I will update you guys.
For those of you who have already done this step can you give me any pointers and what you did on your truck. Thanks for the help in advance!


luifer76
+1y
sorry no help here i normally shorten the arms on my 1/2 ton trucks to be able to tuck big wheels and ride as low as possible....... but im in for any info also keep posting pics bro....

john-e bravada
+1y
That's what I did, 2.5" added to the lowers and 3" on top. Bump steer is my next challenge. I want it gone!

75dually
+1y
I was glad you posted a reply. I was wondering what you did on your truck. Thanks for the info above. That is going to be my starting point.
I did have a question on your truck. What did you do on the top portion of your a-arms? It looks like you formed a top plate. Did you do anything additional on the underside? Just looking for ideas...
About your bump steer... I was doing some research the other day and one possible fix is to take your outer tie rod and instead of mounting it on top, mount it from the bottom of the steering arm. Yes you will need to find someone with a tapered reamer of the right size, but it takes the centerline of the tie rods and moves it down quite a bit. You may even have to add a spacer in there to get the arm as level as possible. Because of the extreme angle we have while the suspension is dropped really magnifies the issue. The more level you can make your tie rods the less bump steer you will have. The other method is to raise the drag link and the steering box, but as you know most of us don't have a lot of room to go up in that area.
Check out the Wiki link below. It explains a lot on bump steer.
I hope that helps. Let me know if it does, because I am going to face the same issues.

john-e bravada
+1y
For my uppers I just boxed the factory stamping with a plate on top. It cleaned up the look and should add some strength to them. I'm hopefully going to make some tubular arms here in the next couple of months. My shocks rub the inside of my rims at full lock. My thought is to run the shocks from just inside of the lower ball joint up thru the middle of the upper arm. I might stand a chance of full lock steering without interference that way.
I have an 1.5" per ft tapered reamer from my off road days but I don't know that parallel to the ground is what we want. It depends on the arc that each control arm swings compared to the tie rods arc. I have it all laid out in SolidWorks and it look like If I move the inner tie rod pivot point out 5/8" it will correct my toe change thru my wheel travel from ride height to laid out. I have a plan to test this I just haven't had time to experiment with it. I'll keep you posted on what I find.
I have an 1.5" per ft tapered reamer from my off road days but I don't know that parallel to the ground is what we want. It depends on the arc that each control arm swings compared to the tie rods arc. I have it all laid out in SolidWorks and it look like If I move the inner tie rod pivot point out 5/8" it will correct my toe change thru my wheel travel from ride height to laid out. I have a plan to test this I just haven't had time to experiment with it. I'll keep you posted on what I find.
BB
big bear
+1y
killer work man..i been watching your build for the duration. looking so sweet. I love all the technical aspects your bringing in. a lot of small details that help alot

75dually
+1y
Thanks man!
There are so many high quality builds on this sight! I don't think I would have started this build without getting to see all the others first. One thing I wanted to do a bit different is put more info on my build. It really wish that some builds had more in depth info. I know we all get super busy and don't have a ton of time, but some go from step 3 to step 27 and it would have been really nice to know how they got there... Don't get me wrong these other builds look super, but there is so much left out it just leaves you hanging. I am sure I have left out a bunch of stuff as well so I am just as guilty.
I just hope my build helps someone else with their ride. Plus I have gotten to meet so many cool guys and see some super talented fabricators on this sight and others.
Related Discussions in Dually Projects
Thread
Posts
Last Post
546
A
last post by
Airnewb91 +1y
193

last post by
Airnewb91 +1y