Bag it or paint it?
6633 views
24 replies
9 following
E
Bag it or paint it?

pont
+1y
Yea its best to do all the fab work befor paint never can tell when something will happen and better not to mess up new paint
H
hex0rz
+1y
Looks like I actually might have to go through all three sites for the best deal! Ynotfab, suicide doors and Klean... I dunno if the 4-link is capable of doing cantilever, but on SD they sell 4-link systems that say cantilever. I want to get the most rise out of my truck as much as I want drop!
Has anyone gone through these soucres and/or could tell me what kind of response you have? Do they offer deals such as partial shipping discounts, etc.? I know SD has a membership discount.
While I'm at it, someone want to explain to me how a cantilever works? My problem is that I learn best visually, LOL!
L
lowblownranger
+1y
if you look under the post i made today on my buddies ranger in the project section says
not a b or a mini more of a sport truck
did all the body work ..
we wrapped the interior in suede then decided he wants to bag the truck.....
when my truck got c notched i had welding splatter on my mirrors ... you can only be so careful and accidents do happen
not a b or a mini more of a sport truck
did all the body work ..
we wrapped the interior in suede then decided he wants to bag the truck.....
when my truck got c notched i had welding splatter on my mirrors ... you can only be so careful and accidents do happen
L
lowblownranger
+1y
but my buddy with the ranger he has quite a bit of money so he said BE AS CAREFUL AS YOU CAN WITH BAGGIN IT... if the paint gets mesed up ill have it repainted... also the guy that painted it thats his 733 HP elcipse in that thread

speedster93b
+1y
personal rule of thumb - do the suspension before bodywork. that way all your cutting and making room for other stuff (unexpected stuff) is done and you can go from there.
the difference in the viair 450 and 380 is that the 450 is rated to 150 psi and the 380 is to 200. that pressure switch might not be a good idea if you are running a pair of 450's. in general the more the merrier when dealing with compressors. nobody likes a compressor that runs forever trying to fill up a big tank.
cantilever means pivot - when you have the bag pushing up on say a bar, and the bar pivots in the center and pushes down on the axle, like a teeter-totter (sp?) to lift the truck. that's the best way i can describe it. you can mount the bag and pivot wherever to best accomidate you're lift and drop.
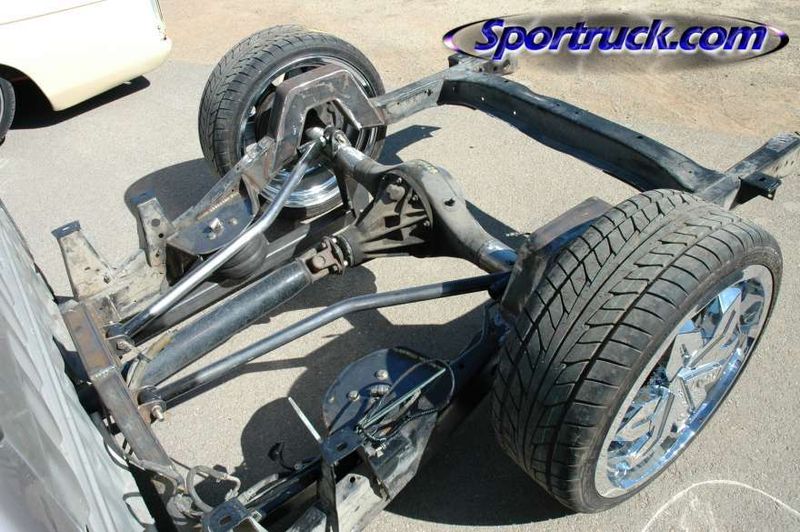
this is a leverage setup - not cantilever (contrary to some)

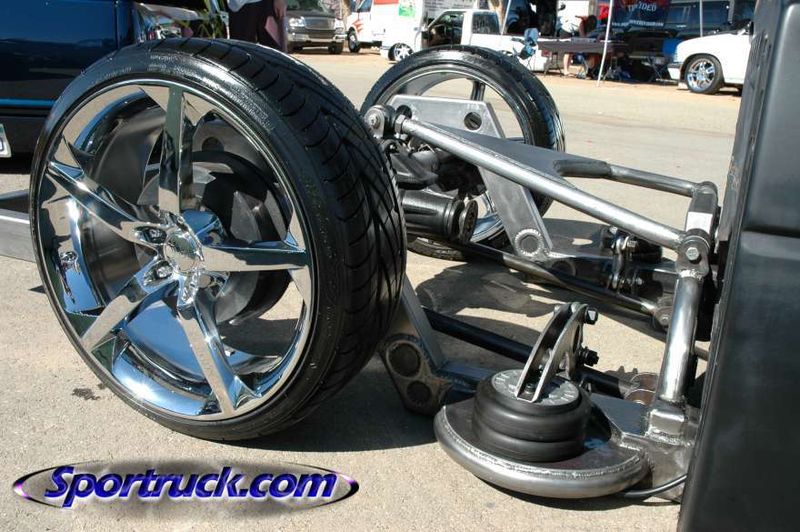
this is cantilever - see the pivot point above the bag?

imo cantilever is not necessary. its cool, but a nice leverage setup would be easier for you to build.
Retro 83 said
the cnotch is ONLY there to provide upward clearance for the axle to travel. not for axle wrap or anything else. just to provide clearance.
don't forget to multiply the cost of the valves times 8 and the bags times 4! that might make a kit look a little more in the ball park.
oh, and gauges. you can get by with 2 dual needle gauges, from airlift or airride, smc? i don't know who all makes them, but you should want 2 dual needle, one needle for each bag. you can get one more single needle gauge for the tank, but if you are running a pressure switch, it would be redundant...
the difference in the viair 450 and 380 is that the 450 is rated to 150 psi and the 380 is to 200. that pressure switch might not be a good idea if you are running a pair of 450's. in general the more the merrier when dealing with compressors. nobody likes a compressor that runs forever trying to fill up a big tank.
cantilever means pivot - when you have the bag pushing up on say a bar, and the bar pivots in the center and pushes down on the axle, like a teeter-totter (sp?) to lift the truck. that's the best way i can describe it. you can mount the bag and pivot wherever to best accomidate you're lift and drop.
this is a leverage setup - not cantilever (contrary to some)

this is cantilever - see the pivot point above the bag?

imo cantilever is not necessary. its cool, but a nice leverage setup would be easier for you to build.
Retro 83 said
the cnotch is ONLY there to provide upward clearance for the axle to travel. not for axle wrap or anything else. just to provide clearance.
don't forget to multiply the cost of the valves times 8 and the bags times 4! that might make a kit look a little more in the ball park.
oh, and gauges. you can get by with 2 dual needle gauges, from airlift or airride, smc? i don't know who all makes them, but you should want 2 dual needle, one needle for each bag. you can get one more single needle gauge for the tank, but if you are running a pressure switch, it would be redundant...

speedster93b
+1y
sorry about linking to another website, but it was quick to find pics!
R
retro83
+1y
You can do a cantilever with the universal 4-link kit!
H
hex0rz
+1y
Lol, I think I'm going to need to ask my teacher for help! lol. I find that the notch and bridge will be easy, etc. But the 4-link, front baggin and shock relocation may be something I'm going to need alot of help on! Lol!
If any of you have any guides, walkthroughs, explanations, etc. so I can get through the whole process let me know!
If any of you have any guides, walkthroughs, explanations, etc. so I can get through the whole process let me know!

laydoutb26
+1y
i'm doin my dawg when i get the cash... i bagged a few torsion minis... 2 to be exact... and one coil mini...
torsion minis are easy... take the c arms off the front, cut the shock tower off... clean up your frame, weld the upper bracket on, then gusset it. on the bottom, weld your circle plates on and bolt your bag in...
notching is easy. 4 linkin is a bit harder because you gotta do ur brackets, angles, and stuff like that...
thats just my 17 yr old opinion..
H
hex0rz
+1y
Lol, well I keep searchin' around for better deals on things! I find that if I take this route it'll save me alot. I revised my decision on what to buy where and here it is:
Triangulated 4-Link kit - $170; Member Price $140 FBI
50 ft. 1/2" DOT airline - $28.97 KLEAN
50 ft. 1/4" DOT airline - $9.99 SD
Fitting Set- Front Back Side to Side with 1/2' port airbags/ cylinders - $89.95; $78.95 FBI
Basic Bridge Kit - $154.97 KLEAN, SD
RE-6 Slam Specialties Airbag - $74.97; $64.95 FBI (4) $299.88
Air Lift 12 Gallon Tank- 8 1/2' ports - $84.95; $74.95 FBI, $74.99 SD
Viair 380 Dual Pack - $258.97 KLEAN
ASCO Water Trap 1/2" - $28.97 (2?) KLEAN $57.94
GC Xtreme1/2" 250psi Valve (8 ) - $28.97 KLEAN $231.76
Clear 10-Switch Box - $29.97 KLEAN
KP 200 PSI Dual Needle - $29.99(2) SD $59.98
KP 200 PSI Single Needle - $14.99 SD
Torsion Front Airbag Brackets - $54.97KLEAN; $69.95, $36.45 FBI
Front Shock Relocation - $33.99SD; $39.95, $27.88 FBI
110/145 PSI Non-Adj Pressure Switch - $18.97 KLEAN; $19.95, $9.88 FBI
Lowest Price W/o FBI Membership - $1,596.29
W/ FBI Membership (Brushed Membership $100)- $1,575.45
Will I need drop shocks? Do I need a solenoid for the compressors? Will I also need a relay for the pressure switch?
With the FBI membership I'll save money! I could probably save more, but I'll have to see how much through FBI. From this list here it sure is nice! Just about everything I need. This does'nt account for shipping charges, and I wonder if I can get shipping discounts through someone if I buy all of it through them?
Retro, I definitely need to get my hands on that compressor deal!
BTW: FBI has diagrams on how to do the 4-link and front bagging, etc.! I looked at it, and I ask, whats the difference between the triangulated 4-link and the wishbone?
Related Discussions in Mazda Lowering Static
Thread
Posts
Last Post
12
L
last post by
Low5.0mazda +1y
